
In this tutorial, I will show you how to setup a Shadowsocks server on Amazon EC2. We also have a tutorial on setting up a Shadowsocks server on DigitalOcean if you are interested.
Please note: this is a quite advanced tutorial for technical guys (or gals) who feel comfortable with doing things such as using Linux commands, setting up linux servers, using SSH and using the vi editor etc. It’s also required that you already have a Amazon Web Services (AWS) account.
In terms of the cost, since AWS offers a 1 year free tier for new EC2 micro instances, if your AWS account qualifies for the free tier, you can host your Shadowsocks server on AWS free of charge for a whole year. Otherwise, the regular cost would be around $16 per month. If you think the cost is too high, you can also try hosting a Shadowsocks server on DigitalOcean for $5 per month.
If you are not a tech-savvy person and you just want to find a way to visit blocked websites from China, I’d recommend you take a look at this list of VPNs that work well in China.
If you are looking for a paid Shadowsocks service, you can try 12VPN, which offers Shadowsocks as part of their VPN plans.
Part 1. Creating a AWS EC2 Instance.
In this step, we will create a AWS EC2 micro instance running Ubuntu. For launching new instances, AWS allows you to choose from a number of server locations. Since I assume you are mostly interested in using Shadowsocks in China, I’d suggest choosing the Asia Pacific (Tokyo) region because it’s probably the best international EC2 server location for China.
First, let’s go to the AWS Management Console and log in with your AWS account. After that, you need to select the Tokyo region from the dropdown menu in the top navigation bar. Then you click on the “EC2” link (on the upper left position on that page).
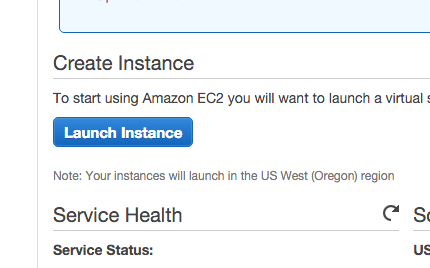
Once you are in the EC2 Management Console, click the blue button “Launch Instance”.
Then you will see a list of Amazon Machine Images (AMIs) for you to choose. Find the one titled “Ubuntu Server 14.04 LTS (HVM) and click on “Select”. (If you are reading this article when there’s already a newer version of Ubuntu server available, just choose the newer one).

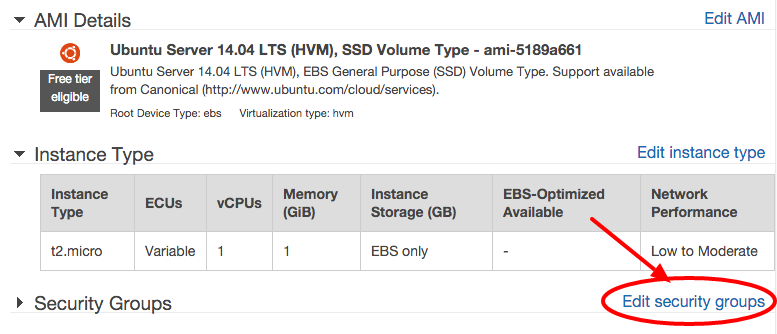
Then you will be asked to select the instance type. Select the first one, t2.micro, because it’s the cheapest one and it’s good enough or a Shadowsocks server. Also, it might be free tier eligible, which means you can use it free of charge for up to 1 year!

Then you click on the blue button down below labeled “Review and Launch”. On the next screen, you will see an warning saying your security group is open to the world. Let’s create a new security group for our instance. Find the link “Edit security groups” (see picture below) and click on it:
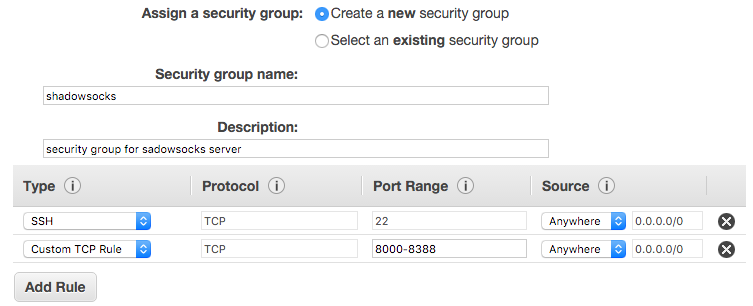
Let’s create a new security group called “shadowsocks”. You can click on the “Add Rule” button to add new rules. Just make the group have the following configuration. Then click on the blue button down below labelled “Review and Launch”.
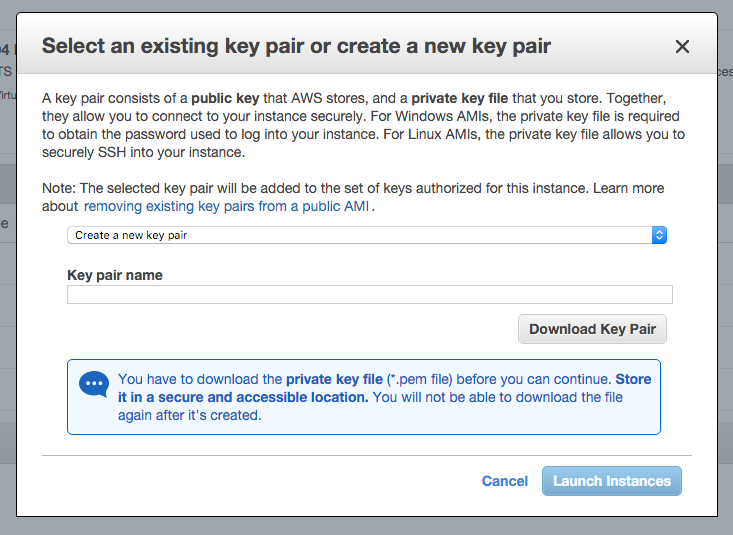
Then you can click on the blue button labeled “Launch”. Then you will see a popup window like the one below that asks you about key pair. If you have already created a key pair before and that key pair is still available on your computer, you can select “using existing key pair”. Otherwise, you can create a new key pair. I will skip the key pair creation step here. Make sure you save your new key pair in a secure place.
After you’re done with key pair, click on the blue button “Launch Instance”. If everything is fine, you will see a message saying ‘Your Instance are now launching”. Click on the “View Instances” button down below to see your newly created instance.
You will see your new instance listed on that page. If you click on the checkbox to the left of that instance, you will see detailed information below the instance list, such as Instance ID, Private DNS, Private IPs etc. Among those, we will need two pieces of information: Public IP and Private IP. Copy and paste these two IPs for later use.
Although the Public IP will work, I’d suggest you get a new Elastic IP and use that IP instead of the default public IP for the new server. That’s because in the future if you stop the instance and then start it again, you might find the public IP address has changed, and then you have to change your Shadowsocks client’s configuration accordingly. Therefore, a static IP will will be better. because it’s stable. To setup a elastic IP, click on the “Elastic IPs” link under “Network & Security” in the left navigation bar in the AWS EC2 console. Then click on “Allocate New Address” and then you can associate the new IP with your new instance. From then on, use this new IP as the Public IP for the server and don’t use the public IP that come with your new instance.
Part 2. Connecting to the New EC2 Instance to Setup Shadowsocks
With the checkbox for our new instance checked, click on the button on the top of the page labeled “Connect”. You will see a popup showing you detailed information on how to connect to your instance using SSH.
Now, let’s SSH to your newly created Ubuntu instance using the SSH command provide in that window. Let me skip instructions on how to SSH to a server from your computer etc. because that would be another long tutorial. Basically, you can use the Terminal application on a Mac or Putty on a Windows machine. The SSH commend will look something like this:
ssh -i "my_key_pair.pem" ubuntu@{your_public_IP}
Once you have SSHed to the server, run the following commands:
First:
$ sudo su
Then let’s update our machine:
$ apt-get update
Then let’s install shadowsocks using these two commands:
$ apt-get install python-pip
$ pip install shadowsocks
Now that Shadowsocks is installed, let’s install M2Crypto to speed up the encryption speed and also install a fast and more secure encryption method called chacha20 using the following commands:
$ apt-get install python-m2crypto
$ apt-get install build-essential
$ wget https://github.com/jedisct1/libsodium/releases/download/1.0.10/libsodium-1.0.10.tar.gz
$ tar xf libsodium-1.0.10.tar.gz && cd libsodium-1.0.10
$ ./configure && make && make install
$ ldconfig
Now let’s create a config file for Shadowsocks. Let’s use the vi editor to create a new file:
$ vi /etc/shadowsocks.json
This file should have the following contents:
{
    "server":"your_private_ip",
     "server_port":8000,
     "local_port":1080,
     "password":"your_passwd",
     "timeout":600,
     "method":"chacha20"
}
You need to replace “your_private_ip” which the private IP address of your EC2 instance (NOT the public IP!) and replace “your_passwd” with a real and better password.
Now let’s try starting the shadowsocks server with the following command:
$ ssserver -c /etc/shadowsocks.json -d start
If you want to double check if everything is fine, you can check on Shadowsocks’ logfile like this:
$ less /var/log/shadowsocks.log
If there’s no error message in the log file, you are OK. In the future, if you want to stop the server, just run “ssserver -c /etc/shadowsocks.json -d stop”. If you want to restart the server, run “ssserver -c /etc/shadowsocks.json -d restart”.
Now let’s configure the server so that after every server reboot our Shadowsocks server will be started automatically. To do so, let’s use vi to edit the following file:
$ vi /etc/rc.local
In this file, add the following line to the bottom, just before the line “exit 0”:
/usr/bin/python /usr/local/bin/ssserver -c /etc/shadowsocks.json -d start
At this point, we’re almost done! If you use a Shadowsocks client to connect to our newly created server, make sure use the public IP (Not the private IP you just added to the configure file) and make sure specify the correct port number (8000 in our example), as well as the correct password. If everything is correct, you will see Shadowsocks working!
But let’s not declare success yet. Let’s do some server optimization to speed up our Shadowsocks server.
Part 3. Shadowsocks Server Optimization
First, let’s increase the max number of open file descriptors so that our server can handle thousands of concurrent connections. Use vi to do this:
$ vi /etc/security/limits.conf
Add the following two lines to that file:
* soft nofile 51200
* hard nofile 51200
Note the “*” symbol is part of the lines. Now let’s temporarily stop the Shadowsocks server:
$ ssserver -c /etc/shadowsocks.json -d stop
And then set the ulimit:
$ ulimit -n 51200
Then let’s tune the kernel parameters by editing the /etc/sysctl.conf file:
$ vi /etc/sysctl.conf
And add the following lines to the end of that file:
fs.file-max = 51200

net.core.rmem_max = 67108864
net.core.wmem_max = 67108864
net.core.netdev_max_backlog = 250000
net.core.somaxconn = 4096

net.ipv4.tcp_syncookies = 1
net.ipv4.tcp_tw_reuse = 1
net.ipv4.tcp_tw_recycle = 0
net.ipv4.tcp_fin_timeout = 30
net.ipv4.tcp_keepalive_time = 1200
net.ipv4.ip_local_port_range = 10000 65000
net.ipv4.tcp_max_syn_backlog = 8192
net.ipv4.tcp_max_tw_buckets = 5000
net.ipv4.tcp_fastopen = 3
net.ipv4.tcp_mem = 25600 51200 102400
net.ipv4.tcp_rmem = 4096 87380 67108864
net.ipv4.tcp_wmem = 4096 65536 67108864
net.ipv4.tcp_mtu_probing = 1
net.ipv4.tcp_congestion_control = hybla
Now run the following command to make our change take effect:
$ sysctl -p
Now let’s start the Shadowsocks server again:
$ ssserver -c /etc/shadowsocks.json -d start
Now we have a more powerful server. But let’s not stop here. Let’s do some more tweaking to make our Shadowsocks server super-fast!
Part 4. Speeding Up Shadowsocks Server Using ServerSpeeder
Update: As of early 2016, ServerSpeeder has stop new user registration as well as new installations. Therefore, this part is no longer relevant. Please skip it and go to Part 5.
To speed up our Shadowsocks server, let’s use a service called ServerSpeeder (锐速). Currently its website is in Chinese, so you might need to figure things out if you don’t understand Chinese. You need to register a free account on that site. Another thing is, you want to double-check to make sure your server’s system is supported by SeverSpeeder. To do so, you can check ServerSpeeder’s list of supported systems.
It’s most likely that our new server is supported. So let’s setup ServerSpeeder on our server. SSH to our server and run the following commands:
$ wget http://my.serverspeeder.com/d/ls/serverSpeederInstaller.tar.gz
$ tar xzvf serverSpeederInstaller.tar.gz
$ bash serverSpeederInstaller.sh
When you run the installer, you will be asked about your email address and password. Just use the email address and password you entered when signing up ServerSpeeder’s free account. During the installation, if it turns out that your Ubuntu server is not supported, you will see an error message and you might consider changing your kernel version to one that’s supported by ServerSpeeder and then run the installer again.
Also, during the ServerSpeeder installation, you will be asked about a few options, just go with the defaults except for this one: “Auto load ServerSpeeder on linux start-up [n]”, for which you should type in “y” to answer yes.
Now we are almost done. Let’s change some configuration values for ServerSpeeder using vi:
$ vi /serverspeeder/etc/config
We need to change the following three values:
rsc="1"
advinacc="1"
maxmode="1"
Now let’s restart ServerSpeeder:
service serverSpeeder restart
Finally, we are done with our Shadowsocks server installation and optimization.
Part 5. Connecting to the Shadowsocks Server
Now we’ve reached the easy part. We need to use a client to connect to our new Shadowsocks server to enjoy a better Internet experience. There’s not much to talk about for this step. Just visit Shadowsocks.org’s client download page to download a client and install it on your system. Then you can start using Shadowsocks.
Enjoy!
Tip 1: How to Configure Multiple Users for Shadowsocks
As you can see from the config file, our current Shadowsocks server only supports one login, i.e., one user name and one password. If you want to set up multiple users each with a different passwords, you can do that by setting up multiple ports, each with a different password. Below is a a config file example for doing that:
{
    "server":"your_private_ip",
    "port_password": {
        "8381": "password1",
        "8382": "password2",
        "8383": "password3",
        "8384": "password4"
    },
    "local_port":1080,
    "timeout":600,
    "method":"chacha20"
}
Tip 2: Use htcp for Congestion Control
Remember when we set up the /etc/sysctl.conf file, the last line we added was:
net.ipv4.tcp_congestion_control = hybla
hybla is good for high latency connections. But because the latency between China and Japan is usually low, we can change to use another congestion control method called htcp to further speed up our Shadowsocks connections. Let’s use this command to set up htcp:
$ modprobe tcp_htcp
Then you can use the following command to verify:
$ sysctl net.ipv4.tcp_available_congestion_control
You should see htcp in the output from that command.
Now let’s update the /etc/sysctl.conf file:
$ vi /etc/sysctl.conf
And change the line with “net.ipv4.tcp_congestion_control” to:
net.ipv4.tcp_congestion_control = htcp
Then run the following command to let the change take effect:
$ sysctl -p
Related Articles
How to Use Shadowsocks on Android
How to Setup A Shadowsocks Server on DigitalOcean
About Us
This article is provided to you by VPNDada.com, a website dedicated to help China Internet users find reliable VPN services to bypass Internet blocking. We are based in China and we test, monitor and review VPN services from China. We have a regularly updated list of Best VPNs for China if you are interested.
Please Join Our VPN Mailing List:
We have a mailing list by which we periodically send out our most recent China VPN test results, VPN for China recommendations and VPN discounts and coupons. If you are a VPN user in China, we highly recommend you sign up for our mailing list: