This is a tutorial on how to setup a Shadowsocks server on DigitalOcean. We have another tutorial on setting a Shadowsocks server on Amazon AWS EC2 if you are interested.
While setting up Shadowsocks on DigitalOcean can be quite easy and might only take 20 minutes, this process does require you have some technical skills, such as using Linux commands, SSH to a remote Linux server, using command line text editor (such as vi) to edit files etc.
If these sound too difficult to you, you can consider using Shadowsocks alternatives, such as a VPN. If you are looking for a VPN to be used in China, please check out our recommended VPNs for China Internet users.
If you are looking for a paid Shadowsocks service, you can try 12VPN, which offers Shadowsocks as part of their VPN plans.
Why Choose DigitalOcean to Host Your Shadowsocks Server
DigitalOcean is a cloud hosting provider that became very popular in recent years. It offers SSD-only servers with a low price, which starts at $5 per month. Compared to Amazon AWS EC2, setting up a Shadowsocks server on Digital Ocean is easier, because you can skip things such as setting up a security group, configuring elastic IP addresses etc.
From our experience, you can choose the cheapest DigitalOcean hosting plan ($5/month) to host your Shadowsocks server and it works pretty well. For this plan, you get a 512 MB RAM, 20 GB SSD disk space and 1TB monthly transfer.
For OS, we will use Ubuntu in this tutorial.
For server location, if you will use Shadowsocks from China, we recommend choosing DigitalOcean’s San Francisco datacenter, because it seems to offer the best speed.
Signing Up a Account with Digital Ocean
If you don’t have a DigitalOcean account yet, first you should sign up to get one. For new users, DigitalOcean offers a free $10 credit. Click on this link to sign up at DigitalOcean to get the $10 credit.
Create a Droplet at DigitalOcean
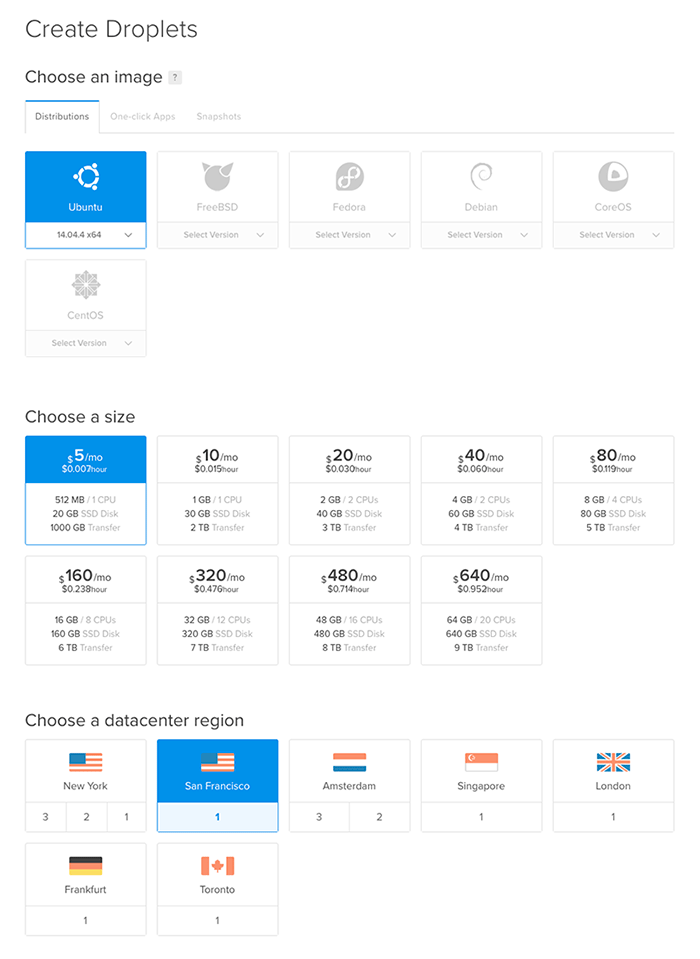
After you have logged in your DigitalOcean account, Click on the “Droplet” link on the top navigation bar and then click on the button “Create Droplet” on the top. Then you will be asked to choose options for your new droplet. We suggest you use the following options:
- Choose an image: select Ubuntu.
- Choose a size: select $5/mo (or the bigger one if you decide to do so)
- Choose a datacenter region: select San Francisco (best for connecting from China)
- Select additional options: none (unless you want to add some)
- Add your SSH keys: add a new SSH key or choose an existing one
Then click on the “Create” button to create your droplet.
Once it’s done, you will be able to see your newly created droplet listed under the Droplets section of your DigitalOcean control panel. Along with the name of the droplet, you will also see a IP address for this droplet. You can use this IP address to SSH to your DigitalOcean server. Later on you will also use this IP address to configure your Shadowsocks client.
Connecting to DigitalOcean Server to Setup Shadowsocks
Now that we have a Digital Ocean server running, we need to connect to it and set up Shadowsocks. You can connect to the server in two ways: using the web based access console provided by DigitalOcean, or SSH to it using a terminal on your local computer. We’d recommend using SSH because with the access console it’s pretty difficult to do copy and paste etc.
Now, let’s SSH to your DigitalOcean server using command like this:
ssh root@{your_droplet's_IP_address}
Once you have SSHed to the server, run the following commands:
First, if your login account is not root:
$ sudo su
Then let’s update our machine:
$ apt-get update
Then let’s install shadowsocks using the following two commands:
$ apt-get install python-pip
$ pip install shadowsocks
Shadowsocks supports a number of encryption methods. For optimized performance, we suggest using the chacha20 encryption method. However, we need to install it first. Below are the commands to setup the chacha20 encryption:
$ apt-get install python-m2crypto
$ apt-get install build-essential
$ wget https://github.com/jedisct1/libsodium/releases/download/1.0.10/libsodium-1.0.10.tar.gz
$ tar xf libsodium-1.0.10.tar.gz && cd libsodium-1.0.10
$ ./configure && make && make install
$ ldconfig
Now let’s create a config file for Shadowsocks, which should be created as “/etc/shadowsocks.json”. Let’s use the vi editor to do so:
$ vi /etc/shadowsocks.json
Add the following contents to the shadowsocks config file:
{
    "server":"your_droplet's_IP_address",
    "server_port":8000,
    "local_port":1080,
    "password":"your_password",
    "timeout":600,
    "method":"chacha20"
}
Note that the configuration above only open up one port (8000) for your Shadowsocks server and it only supports one login. If you want to set up multiple users each with a different passwords, you can do so by setting up multiple ports, each with a different password. Below is a a config file example for doing that:
{
    "server":"your_droplet's_IP_address",
    "port_password": {
        "443": "password1",
        "8000": "password2",
        "8383": "password3",
        "8384": "password4"
    },
    "local_port":1080,
    "timeout":600,
    "method":"chacha20"
}
Now we are pretty much ready. We can start our new Shadowsocks server using this command:
$ ssserver -c /etc/shadowsocks.json -d start
If you want to double check if everything is OK, you can check on Shadowsocks’ log file:
$ less /var/log/shadowsocks.log
If you don’t see any error message in the Shadowsocks log file, then you are fine.
In the future, if you want to stop the Shadowsocks server, use this command: “ssserver -c /etc/shadowsocks.json -d stop”. If you want to restart the Shadowsocks server, use this command: “ssserver -c /etc/shadowsocks.json -d restart”.
There’s one more thing we need to set up. We need to make sure every time the server reboots our Shadowsocks server will be started automatically. To do so, let’s use vi to edit the following file:
$ vi /etc/rc.local
In the file opened, add the following line to the bottom, before “exit 0”:
/usr/bin/python /usr/local/bin/ssserver -c /etc/shadowsocks.json -d start
Cool. Now we have a Shadowsocks server running on DigitalOcean!
If you want to stop here, it’s totally fine. You can now enjoy your newly created Shadowsocks server on DigitalOcean and use it as you wish.
But let’s continue with some tips for Shadowsocks server optimization.
Shadowsocks Server Optimization
By default, our Shadowsocks server might not be able handle a lot of traffic. If you want it to be able to handle a large amount of concurrent connections, you need to increase the max number of open file descriptors. Now let’s do so:
$ vi /etc/security/limits.conf
Add the following two lines to that file:
* soft nofile 51200
* hard nofile 51200
Note: Don’t skip the “*” symbols as they are parts of the lines. After that, let’s temporarily stop the Shadowsocks server:
$ ssserver -c /etc/shadowsocks.json -d stop
And then set the ulimit:
$ ulimit -n 51200
Then let’s tune the kernel parameters by editing the /etc/sysctl.conf file:
$ vi /etc/sysctl.conf
Add the following lines to the end of that file:
fs.file-max = 51200

net.core.rmem_max = 67108864
net.core.wmem_max = 67108864
net.core.netdev_max_backlog = 250000
net.core.somaxconn = 4096

net.ipv4.tcp_syncookies = 1
net.ipv4.tcp_tw_reuse = 1
net.ipv4.tcp_tw_recycle = 0
net.ipv4.tcp_fin_timeout = 30
net.ipv4.tcp_keepalive_time = 1200
net.ipv4.ip_local_port_range = 10000 65000
net.ipv4.tcp_max_syn_backlog = 8192
net.ipv4.tcp_max_tw_buckets = 5000
net.ipv4.tcp_fastopen = 3
net.ipv4.tcp_mem = 25600 51200 102400
net.ipv4.tcp_rmem = 4096 87380 67108864
net.ipv4.tcp_wmem = 4096 65536 67108864
net.ipv4.tcp_mtu_probing = 1
net.ipv4.tcp_congestion_control = cubic
To make our changes take effect, run this command:
$ sysctl -p
Now it’s time to re-start the Shadowsocks server:
$ ssserver -c /etc/shadowsocks.json -d start
Connecting to Shadowsocks Server
Now that you have successfully set up a Shadowsocks server on DigitalOcean, you can connect to it using a Shadowsocks client. Please refer to Shadowsocks.org’s official documents on client set up etc. It’d be too much for us to include the details here. When you configure your client, just make sure to use the correct IP address, port number, password and the encryption methods that you have set up in the Shadowsocks config file.
Related Articles:
How to Use Shadowsocks on Android
How to Setup A Shadowsocks Server on Amazon EC2
Some Additional Notes
For Shadowsocks server optimization, there used to be another trick, which is to use a third-party software called ServerSpeeder to speed up the server. We have seen big speed boost after turning on ServerSpeeder on our Shadowsocks server. However, unfortunately ServerSpeeder stopped accepting new registrations and installation in early 2016. If you have a old ServerSpeeder account that still allows you to install on new servers, you should definitely install it on your DigitalOcean droplet where your Shadowsocks server is hosted. Another trick for using ServerSpeeder is that it only supports a limited number of Linux kernels. The kernel of your server might be too new for ServerSpeeder to support. To get around this problem (given that you indeed can install ServerSpeeder on your server), you can change the kernel to an old one. To do so, you can go to DigitalOcean’s Droplet control panel and click on the “Kernel” link to change the kernel to a different one.
About Us
This article is provided to you by VPNDada.com, a website dedicated to help China Internet users find reliable VPN services to bypass Internet blocking. We are based in China and we test, monitor and review VPN services from China. We have a regularly updated list of Best VPNs for China if you are interested.