Standard VPNs are blocked in China, Russia, Iran, and other restricted regions. Even when you find one that works, AI services like ChatGPT, Claude, and Gemini might still refuse connections from commercial IP addresses. This guide solves both problems at once: you will set up a self-hosted VLESS + REALITY proxy on your own VPS to bypass Deep Packet Inspection, then layer on Cloudflare WARP to route AI service traffic through Cloudflare IPs so those services see a trusted IP instead of a datacenter one. The result is unrestricted access to both the open internet and every major AI service, from a single server you control.

1. Introduction
If you live in or travel to countries such as China, Russia, Iran, or Belarus, you have likely experienced the frustration of popular VPN services being blocked. Standard VPN protocols — OpenVPN, WireGuard, IKEv2 — are fingerprinted and blocked almost instantly by government-operated Deep Packet Inspection (DPI) systems.
This guide walks you through a self-hosted solution that has proven resilient against modern censorship systems in 2026: the VLESS protocol with REALITY transport, combined with Cloudflare WARP to ensure you can also access AI services (such as ChatGPT, Claude, and Gemini) that block commercial VPS IP addresses.
By the end of this guide, you will have:
- A fully configured Xray-core server running VLESS + REALITY on your own VPS
- Cloudflare WARP installed on the server, routing AI service traffic through Cloudflare IPs
- Clash Verge Rev configured on your desktop to connect — one guide covers Windows, macOS, and Linux
2. How It Works
2.1 Why Standard VPNs Fail
Modern censorship systems use Deep Packet Inspection to analyze your internet traffic in real time. Traditional VPN protocols have recognizable signatures — patterns in their handshakes, certificate formats, and packet timing. Once detected, the connection is reset or the server IP is permanently blocked. This explain why it’s hard to find VPNs that work well in China.
2.2 VLESS + REALITY: Traffic That Looks Like Normal HTTPS
VLESS is a lightweight proxy protocol developed by the Xray-core project. When combined with the REALITY transport layer, your traffic becomes indistinguishable from standard TLS connections to legitimate websites such as www.microsoft.com. REALITY borrows the real TLS certificate and handshake behavior of an actual website, making deep packet inspection extremely difficult.
- No detectable VPN handshake — traffic mimics real HTTPS to a chosen legitimate domain
- Uses a real website’s TLS fingerprint as camouflage
- Supports XTLS Vision flow, which further reduces latency
- Actively maintained and updated in response to new censorship techniques
2.3 The Problem: AI Services Block Datacenter IPs
Even with VLESS working perfectly, AI services such as ChatGPT, Claude, and Gemini will likely block your requests. These companies routinely blocklist commercial datacenter IP ranges (from Vultr, Hetzner, DigitalOcean, etc.) to prevent automated abuse. Your VPS IP falls squarely into this category.
2.4 The Solution: Cloudflare WARP on the Server
Cloudflare WARP is a free service from Cloudflare. When installed on your VPS in proxy mode, it runs a local SOCKS5 proxy on port 40000. You configure Xray to route outbound traffic destined for AI service domains through this local proxy — so AI services see a Cloudflare IP address instead of your datacenter IP.
The complete traffic path:
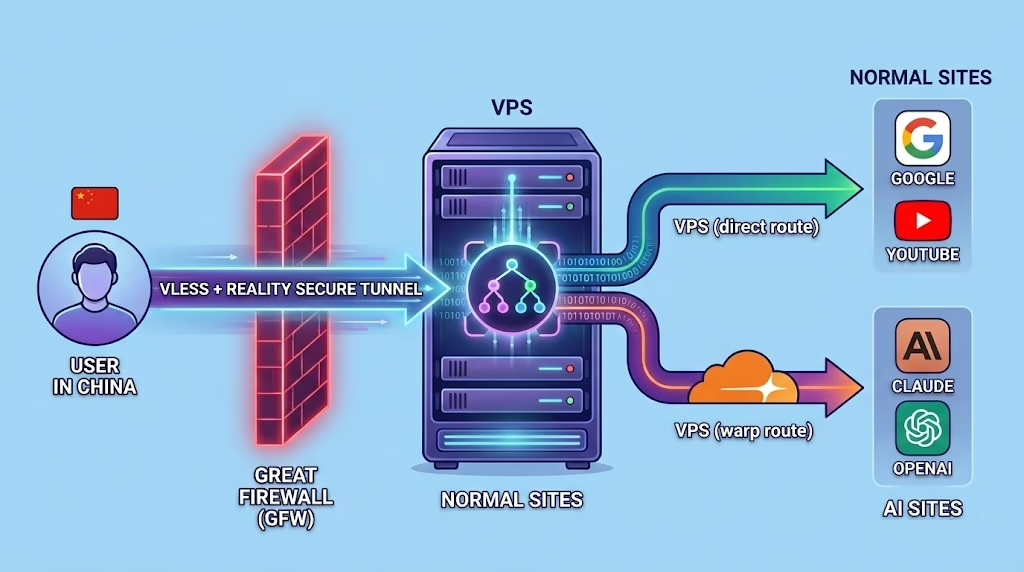
Note: Cloudflare WARP runs in split-tunnel mode. Only traffic to AI service domains routes through WARP. All other traffic exits the VPS directly, keeping latency low for general browsing.
3. Prerequisites
3.1 VPS Requirements
| Requirement | Recommended | Notes |
|---|---|---|
| Operating System | Ubuntu 22.04 or 24.04 LTS | This guide uses Ubuntu. Debian 11/12 also works. |
| RAM | 512 MB minimum | 1 GB or more recommended for stability |
| vCPU | 1 vCPU minimum | Any modern entry-level VPS plan is sufficient |
| Location | Outside your country | Japan, Singapore, Germany, and the US are popular choices |
| Open Port | 443 (TCP) | Port 443 blends with normal HTTPS and is less likely to be blocked |
| Access | Root or sudo | Required for installing packages and system services |
Important: VPS location affects this setup in two ways. First, choose a provider whose IP ranges are not blocked in your country (popular choices: DigitalOcean, Vultr and BandwagonHost). Second, and equally important, choose a location in a region where AI services are available — several major AI providers including OpenAI/ChatGPT do not serve users in certain regions such as Mainland China or Hong Kong, and this restriction is enforced by the server’s IP location, not the client’s. A VPS in the US, Germany, Japan, or Singapore will work with all major AI services. A VPS in Hong Kong or mainland China will likely still be blocked by those services even with WARP active.
3.2 Client Requirements
This guide uses Clash Verge Rev, a free open-source proxy client for Windows, macOS, and Linux. It is built on the Mihomo core (formerly Clash Meta), which has full native support for VLESS + REALITY. The same steps apply on all three platforms — no separate OS-specific instructions are needed.
Download Clash Verge Rev from: https://github.com/clash-verge-rev/clash-verge-rev/releases
4. Server Setup
All commands in this section are run on your VPS over SSH. Connect to your server first:
ssh root@YOUR-VPS-IP
Step 1: Update the System
apt update && apt upgrade -y
apt install -y curl wget openssl uuid-runtime
Step 2: Install Xray-core
Use the official one-line install script maintained by the XTLS project on GitHub:
bash <(curl -L https://github.com/XTLS/Xray-install/raw/main/install-release.sh)

# Alternative syntax (use this if the above does not work in your shell):
bash -c "$(curl -L https://github.com/XTLS/Xray-install/raw/main/install-release.sh)"
When the script completes, verify the installation:
xray version
After installation: the binary is at /usr/local/bin/xray, the config file is at /usr/local/etc/xray/config.json, and the service is managed by systemd as xray.
Step 3: Generate Your Credentials
You need three values for VLESS + REALITY: a UUID (user identifier), an X25519 key pair, and a short ID. Run each command below and save the output — you will need these in both the server config and the client config.
# 1. Generate a UUID
cat /proc/sys/kernel/random/uuid

# 2. Generate an X25519 key pair
xray x25519

# 3. Generate a short ID (8 hex characters)
openssl rand -hex 4
Your output will look like this:
PrivateKey: M4cZLR81ErNfxnG1fAnNUIATs_UXqe6HR78wINhH7RA
Password:   ioE61VC3V30U7IdRmQ3bjhOq2ij9tPhVIgAD4JZ4YRY
Hash32:     (not needed for this setup — you can ignore this line)
Important: Despite the label,
Passwordis actually the key used in the client config. The xray developers deliberately chose this name to discourage people from sharing it carelessly, since it can be used to probe REALITY servers. Treat it like a credential — do not post it publicly.
Here is where each value goes:
| Value | Output label | Where it goes |
|---|---|---|
| UUID | (from the cat command) | Server config AND client config |
| Private key | PrivateKey | Server config only |
| Password | Password | Client config only |
| Short ID | (from the openssl command) | Server config AND client config |
Save all four values now before moving on.
Step 4: Configure Xray (VLESS + REALITY)
Open the Xray configuration file:
nano /usr/local/etc/xray/config.json
Replace the entire file contents with the configuration below. Substitute the three placeholder values marked in uppercase with the credentials you generated in Step 3:
{
  "log": {
    "loglevel": "warning"
  },
  "inbounds": [
    {
      "listen": "0.0.0.0",
      "port": 443,
      "protocol": "vless",
      "settings": {
        "clients": [
          {
            "id": "YOUR-UUID-HERE",
            "flow": "xtls-rprx-vision"
          }
        ],
        "decryption": "none"
      },
      "streamSettings": {
        "network": "tcp",
        "security": "reality",
        "realitySettings": {
          "show": false,
          "dest": "www.microsoft.com:443",
          "xver": 0,
          "serverNames": ["www.microsoft.com"],
          "privateKey": "YOUR-PRIVATE-KEY-HERE",
          "shortIds": ["YOUR-SHORT-ID-HERE"]
        }
      }
    }
  ],
  "outbounds": [
    {
      "tag": "direct",
      "protocol": "freedom"
    },
    {
      "tag": "warp-out",
      "protocol": "socks",
      "settings": {
        "servers": [
          {
            "address": "127.0.0.1",
            "port": 40000
          }
        ]
      }
    },
    {
      "tag": "block",
      "protocol": "blackhole"
    }
  ],
  "routing": {
    "domainStrategy": "AsIs",
    "rules": [
      {
        "type": "field",
        "domain": [
          "openai.com",
          "api.openai.com",
          "chatgpt.com",
          "oaiusercontent.com",
          "claude.ai",
          "anthropic.com",
          "gemini.google.com",
          "perplexity.ai",
          "mistral.ai",
          "cohere.com",
          "huggingface.co"
        ],
        "outboundTag": "warp-out"
      },
      {
        "type": "field",
        "ip": ["geoip:private"],
        "outboundTag": "block"
      }
    ]
  }
}
Note: You can add more AI service domains to the warp-out list at any time. After editing, restart Xray with:
systemctl restart xray
Lost your Password value? Re-run
xray x25519 -i YOUR-PRIVATE-KEY(replacing with the PrivateKey from your config). ThePasswordfield in the output is what you need for the client. Alternatively, runxray x25519to generate a fresh key pair, then update theprivateKeyin your server config and restart Xray.
Step 5: Open Firewall Port and Start Xray
# Allow port 443 (TCP)
ufw allow 443/tcp
ufw --force enable

# Start Xray and enable it to run automatically on boot
systemctl start xray
systemctl enable xray

# Confirm it is running
systemctl status xray
You should see “active (running)” in the status output. If Xray fails to start, diagnose with:
xray -test -c /usr/local/etc/xray/config.json
Step 6: Install Cloudflare WARP
Add Cloudflare’s official package repository and install the WARP client:
# Add Cloudflare GPG key
curl -fsSL https://pkg.cloudflareclient.com/pubkey.gpg | \
  sudo gpg --dearmor -o /usr/share/keyrings/cloudflare-warp-archive-keyring.gpg

# Add the WARP repository
echo "deb [signed-by=/usr/share/keyrings/cloudflare-warp-archive-keyring.gpg] \
  https://pkg.cloudflareclient.com/ $(lsb_release -cs) main" | \
  sudo tee /etc/apt/sources.list.d/cloudflare-client.list

# Install
sudo apt update && sudo apt install cloudflare-warp -y
Step 7: Configure and Connect WARP
Register the WARP client, switch it to proxy mode (which exposes a SOCKS5 proxy on 127.0.0.1:40000), and connect. Note: modern versions of warp-cli use registration new and mode instead of the older register and set-mode subcommands.
# Register the WARP client (only needed once)
warp-cli registration new

# Switch to proxy mode (SOCKS5 on port 40000)
warp-cli mode proxy

# Connect to Cloudflare WARP
warp-cli connect

# Confirm it is connected
warp-cli status
You should see “Status update: Connected”. Now verify that the WARP proxy is routing through a Cloudflare IP:
# This should return a Cloudflare IP address, not your VPS IP
curl --socks5 127.0.0.1:40000 https://ifconfig.me
Important: WARP must be connected for Xray to route AI traffic through it. If WARP disconnects after a server reboot, follow Step 8 to make it reconnect automatically.
Step 8: Enable WARP Auto-Start on Boot
Create a small systemd service that reconnects WARP every time the server boots:
cat > /etc/systemd/system/warp-autoconnect.service << 'EOF'
[Unit]
Description=Cloudflare WARP auto-connect
After=network-online.target warp-svc.service
Wants=network-online.target

[Service]
Type=oneshot
ExecStart=/usr/bin/warp-cli connect
RemainAfterExit=yes

[Install]
WantedBy=multi-user.target
EOF

systemctl daemon-reload
systemctl enable warp-autoconnect.service
Step 9: Restart Xray to Apply All Settings
systemctl restart xray
systemctl status xray
Your server is now fully configured. Here is a summary of what is running:
- Xray listening on port 443 with VLESS + REALITY transport
- Cloudflare WARP connected, running as SOCKS5 proxy on 127.0.0.1:40000
- AI service domains (OpenAI, Claude, Gemini, Perplexity, etc.) automatically routed through WARP
- All other traffic exits the VPS directly, keeping general browsing fast
5. Client Setup: Clash Verge Rev
Clash Verge Rev is a free, open-source proxy client available for Windows, macOS, and Linux. It is built on the Mihomo core (formerly Clash Meta), which has full native support for VLESS + REALITY. The setup steps are identical on all three platforms.
5.1 Download and Install
Visit the releases page and download the installer for your OS:
https://github.com/clash-verge-rev/clash-verge-rev/releases
| Operating System | File to Download |
|---|---|
| Windows (64-bit) | clash-verge_x.x.x_x64-setup.exe |
| macOS (Apple Silicon / M-chip) | clash-verge_x.x.x_aarch64.dmg |
| macOS (Intel) | clash-verge_x.x.x_x64.dmg |
| Linux (Debian / Ubuntu) | clash-verge_x.x.x_amd64.deb |
| Linux (universal AppImage) | clash-verge_x.x.x_amd64.AppImage |
Install it as you would any application. On macOS, if the app is blocked on first launch, go to System Settings > Privacy & Security and click “Open Anyway”.
5.2 Create Your Proxy Configuration File
Create a new text file on your computer named vless-config.yaml. Paste the following content and replace all YOUR-... placeholders with your actual server credentials from Section 4, Step 3.
# Clash Verge Rev / Mihomo config for VLESS + REALITY
# Replace all YOUR-... values with your actual credentials

port: 7890
socks-port: 7891
allow-lan: false
mode: rule
log-level: info
external-controller: 127.0.0.1:9090

proxies:
  - name: "My VPS"
    type: vless
    server: YOUR-VPS-IP-OR-DOMAIN
    port: 443
    uuid: YOUR-UUID-HERE
    network: tcp
    tls: true
    udp: true
    flow: xtls-rprx-vision
    reality-opts:
      public-key: YOUR-PASSWORD-HERE
      short-id: YOUR-SHORT-ID-HERE
    servername: www.microsoft.com
    client-fingerprint: chrome

proxy-groups:
  - name: "PROXY"
    type: select
    proxies:
      - "My VPS"
      - DIRECT

rules:
  - GEOIP,private,DIRECT,no-resolve
  - GEOIP,CN,DIRECT
  - MATCH,PROXY
Note: The
public-keyfield in the YAML takes thePasswordvalue from Step 3 — not thePrivateKey. ThePrivateKeystays on the server only. The UUID and short-id must match exactly between server and client configs.
5.3 Import the Configuration into Clash Verge Rev
- Open Clash Verge Rev on your computer
- Click Profiles in the left sidebar
- Click the Import button and select your
vless-config.yamlfile - The profile appears in the list. Click it to activate it (a checkmark will appear)
- Go to Proxies in the left sidebar
- Click on the PROXY group and select “My VPS”
- Return to the main screen and enable the System Proxy toggle
Clash Verge Rev will now route your internet traffic through your VLESS server.
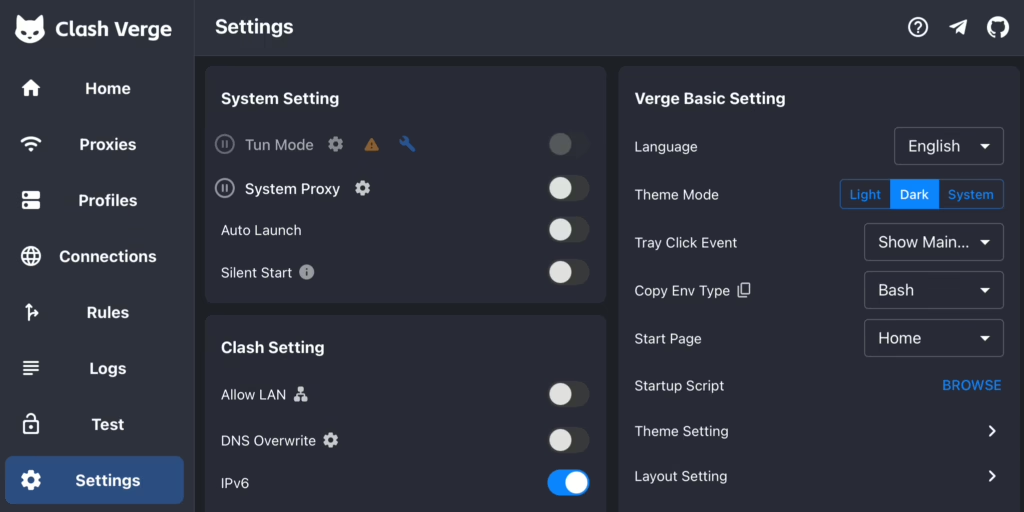
5.4 Enable TUN Mode (Recommended)
TUN mode captures traffic at the OS network level, ensuring every application on your device routes through the proxy — including apps that ignore standard system proxy settings.
- Open Settings in Clash Verge Rev
- Scroll to find the TUN Mode section
- Toggle Enable TUN Mode to on
- If prompted to install a virtual network driver, accept and install it
Note: TUN mode is especially useful for applications like Discord, game clients, and terminal tools that do not respect system proxy settings. It captures all traffic at the network driver level.
6. Verifying Your Setup
6.1 Check Your IP Address
With Clash Verge Rev connected and System Proxy enabled, visit either of these in your browser:
You should see your VPS’s IP address, not your local ISP IP. This confirms traffic is routing correctly.
6.2 Test AI Service Access
Try accessing the services below. If WARP is working correctly on the server, all of these should load without any access restrictions or VPN-related error messages:
| Service | URL | Expected Result |
|---|---|---|
| ChatGPT | https://chat.openai.com | Loads normally, no VPN block message |
| Claude | https://claude.ai | Loads normally |
| Gemini | https://gemini.google.com | Loads normally |
| Perplexity | https://perplexity.ai | Loads normally |
6.3 Confirm WARP Is Routing AI Traffic
SSH into your VPS and run a quick test to confirm the WARP proxy is active and showing a Cloudflare IP:
# Via WARP proxy - should show a Cloudflare IP
curl --socks5 127.0.0.1:40000 https://ifconfig.me

# Direct VPS IP - should be different from the above
curl https://ifconfig.me
The two addresses should be different. The WARP result should show a Cloudflare-owned IP address.
7. Troubleshooting
| Problem | Likely Cause | Fix |
|---|---|---|
| Cannot connect to the server at all | Port 443 blocked or Xray not running | Run ufw status and confirm port 443 is ALLOW. Check systemctl status xray. |
| Xray starts then immediately stops | Syntax error in config.json | Run xray -test -c /usr/local/etc/xray/config.json to identify the error line. |
| Connected, but AI services are blocked | WARP not connected on server | SSH in, run warp-cli status. If disconnected, run warp-cli connect. |
| Clash Verge shows connection error | Wrong credentials in client config | Double-check the public key, UUID, and short-id match the server config exactly. |
| WARP connected but AI still blocked | WARP IP was blocklisted | Run warp-cli disconnect && warp-cli connect to obtain a new Cloudflare IP. |
| Works for some sites, not others | Domain missing from routing rules | Add the missing domain to the warp-out domain list in config.json, restart Xray. |
| High latency | VPS is geographically far from you | Choose a VPS in a region closer to your physical location. |
| After reboot, AI access stops working | WARP did not reconnect | Check: systemctl is-enabled warp-autoconnect.service. Re-enable if needed. |
8. Security Best Practices
Protect Your Server
- Disable password-based SSH login and use SSH key authentication. Edit
/etc/ssh/sshd_configand setPasswordAuthentication no. - Keep the system updated. Run
apt update && apt upgrade -yregularly or set up unattended upgrades. - Keep the attack surface small: only ports 22 (SSH) and 443 (Xray) should be open. Close all others with
ufw. - Consider moving SSH to a non-standard port (e.g., 2222) to reduce exposure to automated brute-force scans.
Protect Your Credentials
- Never share your UUID or private key. Anyone with these values can route all their traffic through your server at your cost.
- Rotate your UUID periodically by generating a new one and updating both the server and client configs.
- If you suspect your server has been discovered or your IP blocked, migrate to a new VPS or request a new IP from your provider.
9. Not Ready to Self-Host? Consider a Commercial VPN
Setting up a VPS and configuring Xray, WARP, and firewall rules takes time and technical confidence. If you’d prefer a simpler solution — one that requires no server management, no command line, and works out of the box — a reputable commercial VPN may be a better fit for your needs.
The services below are well-established, support strong encryption protocols, and have large enough IP pools to reliably unblock AI services and bypass restrictions in heavily censored regions. They also offer apps for Windows, macOS, iOS, Android, and Linux, so no separate client setup is required.
✔ Good at countering VPN blocking
✔ 30-day money-back guarantee
VPN Review: ExpressVPN Review
✔ 30-day money-back guarantee
VPN Review: Surfshark VPN Review
Legal Notice
Important: Using circumvention tools may be restricted or illegal in your country. This guide is provided for educational and informational purposes only. You are solely responsible for understanding and complying with all applicable laws and regulations in your jurisdiction.